|
<< Click to Display Table of Contents >> Using the ReBar Tools to Correct Barlines |
  
|
|
<< Click to Display Table of Contents >> Using the ReBar Tools to Correct Barlines |
|
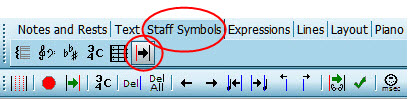
The ReBar Palette
The ReBar tool palette (keyboard shortcut "|") is located in the Staff Symbols tab. This picture shows how it typically appears, when the detail palette is "docked" horizontally at the top of Composer's window.
![]() Tips while using the Rebar tools:
Tips while using the Rebar tools:
| We strongly suggest that you perform any rebar adjustments as the first editing that you perform on a file. Just as for Re-Transcribing a MIDI (.mid) file, using the Rebar feature's "Show barline adjustments" |
| Using the Rebar feature to adjust the barlines (and thus the notation) is a step-wise process. Therefore, unlike other palettes, you cannot select other objects (such as notes or chord names) to work on while you are in the Rebar palette. You can still switch to another tab by clicking the other tab (eg. Notes and Rests) and then working on those aspects of the score. However, trying to select other objects in the score while you are working in the Rebar palette will not automatically change the working tab. |
| Like other editing palettes, you can use the Edit / Undo command at any point during your work in the Rebar palette. If you leave your file, or close Composer and save the file, your rebar editing will be saved at the point you closed the file. When you open the file next time to continue editing, you can resume where you stopped previously. |
| Rebar objects show up red in the score. To select an object to edit, just use the mouse to click on it. The selected object will then turn blue, and you can use the Rebar palette tools to edit the rebar line and its associated meter. After editing and then finalizing the barlines, the red rebar objects will be erased to leave a "clean" score. |
You can always go back through the rebar process any time you want but do be aware that any other types of edits you have done to your score will be lost if you use "Show adjustments" or "Finalize". If you stop working on your Rebar edits, Composer will save your rebar work at the point you stopped.
Sometimes the transcribed barlines of a file may be almost correct, and only need some slight adjustments to line up the barlines properly and give correct sheet music. Composer does put "reference" barlines in any file when the song is first opened, and these can be used as beginning points for lining up the barlines in a metronomeless recording. One of the easiest ways to adjust the barlines for measures is to make all the barlines into editable rebar lines and then quickly edit them.
![]() To use existing barlines as starting points:
To use existing barlines as starting points:
| 1. | After opening the .mid file, or finishing recording, navigate to the Rebar palette in the Staff Symbols tab. |
-- OR --
Type "|" to bring up the Rebar palette.
2. Click the "Make barlines editable" button ![]() (keyboard shortcut "e"). The score will now show the rebar lines and meters, which are now ready to edit, as in the following score, which is the same file as the picture above, but now with the rebar lines displayed:
(keyboard shortcut "e"). The score will now show the rebar lines and meters, which are now ready to edit, as in the following score, which is the same file as the picture above, but now with the rebar lines displayed:

Other files may have more complex tempo changes, or may just be so completely "off" from the transcribed barlines that it would be simpler to record in the correct (or nearly correct) placement of barlines using the "tap in" recording method.
![]() To record new rebar lines
To record new rebar lines
| 1. | It will probably be helpful to listen to the file a few times, so that you can hear and get a better understanding of where the tempo changes occur. This will help you to more accurately tap in the rebar lines during recording. Keep in mind that the rebar lines don't have to be placed perfectly the first time you record. You can re-record the rebar lines for an entire song, or re-record just a selected region of the score ("punch in"). You also have many tools and options available for finely adjusting the rebar lines so that your notation will be correct when you finish. |
| 2. | After listening to the song a few times, and perhaps practicing tapping your computer keyboard's "Insert" (INS) key on beat "one", you will be ready to record the rebar lines. To begin recording the rebar lines, click the "Record barlines or beats" |
| 3. | Composer will give you a couple of seconds to find the "Insert" (INS) key on your keyboard before the file begins to play. As the file plays, tap the "Insert" key (INS) button on your computer keyboard on every beat "one". You will notice that there will be a red rebar line inserted into the score at each place you tap. |
| 4. | When you are done, hit the Spacebar on your computer keyboard, or click the "Record barlines or beats" button again to stop recording. |
At the end of recording, Composer will automatically re-transcribe the notation for the file according to the rebar lines that you have recorded. If you are not satisfied with your rebar line recording, you can re-record the entire song, or you can "punch in" a select region of the score. You can also see below for adjusting the rebar lines manually with the toolbar tools.
Tip: What if you notice that the rebar lines you record are not where you thought you tapped, or you see that each note highlights before you hear the note play? In this case, your MIDI playback device may have a problem with latency. "Latency" means that there is some time between when Composer "requests" the sound from the MIDI device, and the time you actually hear it. Composer now allows you to calibrate your MIDI Device using the same "Insert" (INS) key tap-in procedure as for recording rebar lines or beat marker lines. Just click the "Calibrate MIDI Device" ![]() button in the Rebar palette, or the command in the menu list, and follow the directions in the dialog box that appears. After calibrating your MIDI device, Composer will then save that setting, and adjust for the latency of that MIDI device when you play a file using that device or use the tap-in recording method for rebar lines or beat markers.
button in the Rebar palette, or the command in the menu list, and follow the directions in the dialog box that appears. After calibrating your MIDI device, Composer will then save that setting, and adjust for the latency of that MIDI device when you play a file using that device or use the tap-in recording method for rebar lines or beat markers.
![]() To record rebar bar lines in a specific region ("punch in")
To record rebar bar lines in a specific region ("punch in")
1. Click on the "Select Region Mode" button in the main toolbar (or right-click your mouse to change modes).
2. Click-drag the mouse to select the region you would like to re-record.
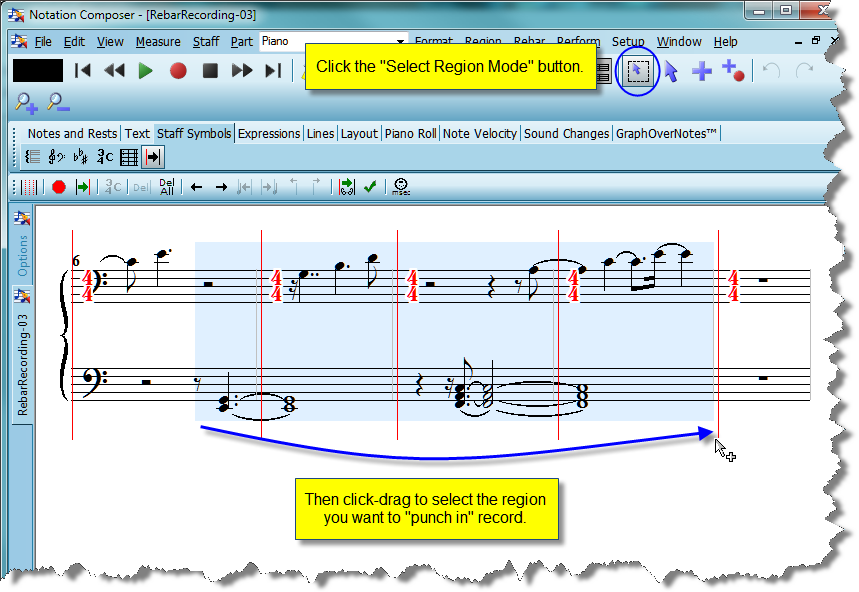
| 3. | Now click the "Record Barlines or Beats" |
| 4. | When you are finished, Composer will automatically stop recording, and retranscribe the notation according to the new rebar lines you have just recorded. |
You can also use your mouse to enter rebar lines. Using this method will not automatically display the change in the notation after each entry, but you can use the "Show Barline Adjustments" ![]() button to retranscribe the score and see the corrected notation whenever you want.
button to retranscribe the score and see the corrected notation whenever you want.
![]() To Enter Rebar lines using the mouse
To Enter Rebar lines using the mouse
| 1. | From the Rebar palette, click the "Add mode" button in the main tool bar (or right-click your mouse to change modes) |
| 2. | Now click in the score at the location (typically on a note) for the first beat of the measure where you want to enter a barline. |
The meter that is associated with a rebar line affects how the notes of that measure are transcribed. In some cases you may need to change the meter associated with one or more rebar lines for the notation to be transcribed properly.
![]() Correcting the meter of a measure
Correcting the meter of a measure
1. Select a rebar line by clicking on it and then click the "Change Meter" button in the palette
-- OR --
Double click the meter of a rebar line that you want to change.
2. In the Change Meter dialog, click the radio button of the meter you want for that measure, or click "Other" and enter the custom meter you want for the measure.
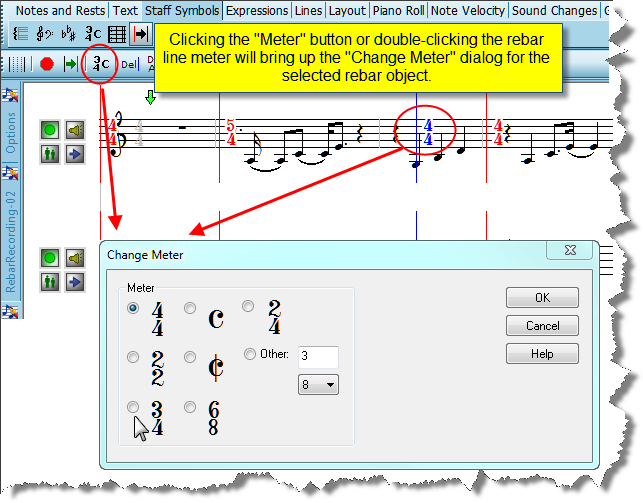
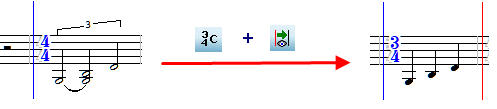
3. After selecting the meter you want for the measure (eg. 3/4), click "Ok".
4. To see the corrected notation, click the "Show adjustments" ![]() button. Composer will then retranscribe the notation using the new meter for that measure.
button. Composer will then retranscribe the notation using the new meter for that measure.
Beat Markers Within a Measure
Some files may contain more dramatic changes in tempo within a single measure. Such tempo changes cannot be accurately transcribed to good notation just by adjusting the barlines.
For these situations, you can use the Beat Zoom ![]() button to enter individual beats in a selected measure or measures. Turning "on" the Beat Zoom means that beat marker lines can be added by using the same methods as for adding rebar barlines, but with the resolution adjusted to beats rather than barlines.
button to enter individual beats in a selected measure or measures. Turning "on" the Beat Zoom means that beat marker lines can be added by using the same methods as for adding rebar barlines, but with the resolution adjusted to beats rather than barlines.
![]() To Record Beat Markers
To Record Beat Markers
| 1. | Using Region Select (the same as for selecting a region in "punch in recording" above), select the measure(s) that you want to record beat markers into. |
| 2. | It will probably be helpful to listen to the passage a few times, so that you can hear and get a better understanding of where the tempo changes occur. This will help you to more accurately tap in the beat marker lines during recording. Keep in mind that the beat marker lines don't have to be placed perfectly the first time you record. You can re-record the beat marker lines for the measure(s) you have selected as many times as you wish. You also have many tools and options available for finely adjusting the beat marker lines (such as "Shift to nearest next note") so that your notation will be correct when you finish. |
| 3. | After listening to the passage a few times, and perhaps practicing tapping your computer keyboard's "Insert" (INS) key on the beats you hear, you will be ready to record the beat marker lines. To begin recording the beat marker lines, click the "Record barlines or beats" |
| 4. | Composer will play a short bit before your selected region, to give you a couple of seconds to find the "Insert" (INS) key on your keyboard before beginning recording. As the file plays, tap the "Insert" key (INS) button on your computer keyboard on the beats. You will notice that there will be a red dashed beat marker line inserted into the score at each place you tap. |
| 5. | When you are done, hit the Spacebar on your computer keyboard, or click the "Record barlines or beats" button again to stop recording. |
![]() To Enter Beat markers using the mouse:
To Enter Beat markers using the mouse:
1. From the Rebar palette, click the "Add mode" button in the main tool bar (or right-click your mouse to change modes)
| 2. | Make sure that the Beat Zoom button is "on". |
| 3. | Now click in the score at the location (typically on a note) for the first beat of the measure where you want to enter a barline. |
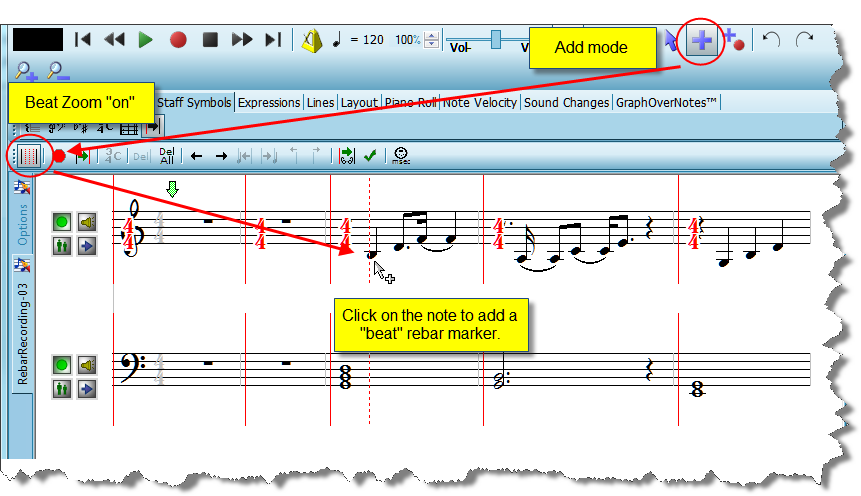
4. Continue clicking on the specific notes that should be "on the beat".
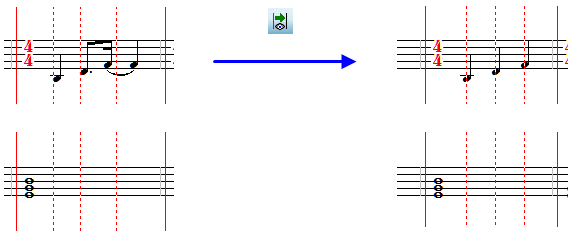
5. When you are done entering beat marker lines, then click the "Show Adjustments" ![]() button. Composer will retranscribe the notation to adjust it for your beat markers.
button. Composer will retranscribe the notation to adjust it for your beat markers.
Composer Makes it easy for you to fine-tune the rebar line and beat marker adjustments so that the notation for your file will be playable and the performance will remain faithful to the recording when you play the file back.
Please note that all the editing tools of the ReBar palette work the same for rebar bar lines or for beat marker lines.
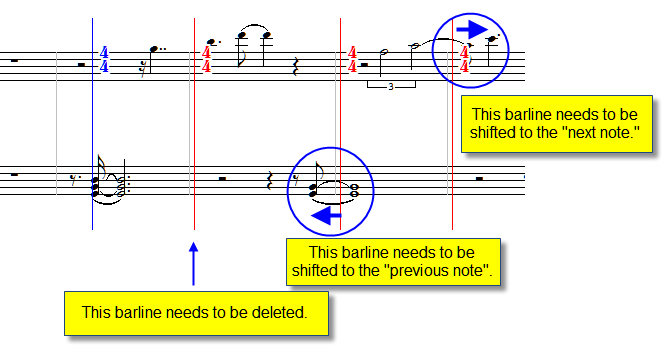
If you use the "Make barlines editable" command or button ![]() (keyboard shortcut "e"), you may find that there will be "extra" rebar lines that need to be removed, or rebar lines that need to be shifted to a previous or next note.
(keyboard shortcut "e"), you may find that there will be "extra" rebar lines that need to be removed, or rebar lines that need to be shifted to a previous or next note.
![]() To delete a rebar line:
To delete a rebar line:
| 1. | Click on the barline to select it. |
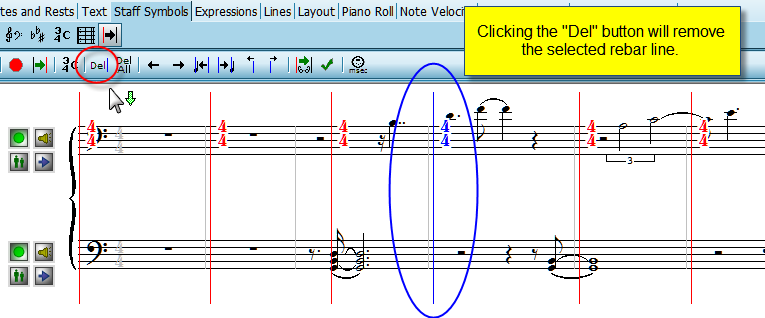
| 2. | Click on the "Delete" |

![]() Deleting all Rebar and Beat Marker Lines and Meters
Deleting all Rebar and Beat Marker Lines and Meters
If you want to remove all the rebar lines for a fresh start at entering and editing them, simply click on the "Delete All" ![]() button (or type "Shift + Del"). All rebar objects (rebar lines, meters, and any beat marker lines) will be removed from the score. No transcription changes will be made, and you can begin the process of editing the barlines from scratch.
button (or type "Shift + Del"). All rebar objects (rebar lines, meters, and any beat marker lines) will be removed from the score. No transcription changes will be made, and you can begin the process of editing the barlines from scratch.
![]() Moving a Rebar line to the next note on the right
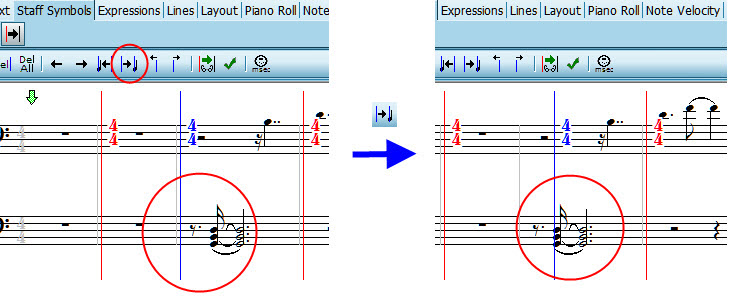
Moving a Rebar line to the next note on the right
In this particular file the left-hand (bass clef) chords were intended to sound on beat 1. To edit any rebar line, simply click on it to select it for editing. Click on the rebar line to edit it, and then click the "Shift rebarline to next note" button ![]() (or type "Shift + right arrow key")
(or type "Shift + right arrow key")
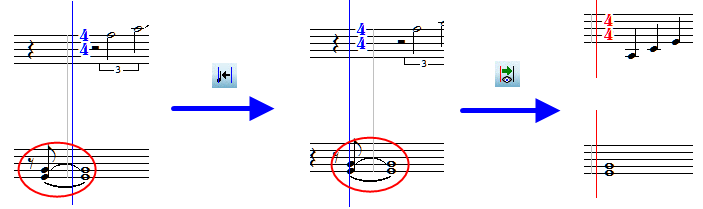
![]() Moving a Rebar line to the previous note on the left
Moving a Rebar line to the previous note on the left
The process for shifting a rebar line to the left to correct the notation is similar to that for shifting the rebarline to the next note to the right. Using the "Show adjustments" ![]() button after either type of rebar line shift will then show you the newly transcribed notation. You can do the same type of shift for a beat marker line as well.
button after either type of rebar line shift will then show you the newly transcribed notation. You can do the same type of shift for a beat marker line as well.
![]() Moving the selection of a Rebar line
Moving the selection of a Rebar line
Using the "Select previous" ![]() button (left arrow key) or "Select Next"
button (left arrow key) or "Select Next" ![]() button (right arrow key) will change the selected object to the next rebar line or beat marker line in their respective direction.
button (right arrow key) will change the selected object to the next rebar line or beat marker line in their respective direction.
![]() Shifting the selected Rebar or Beat Marker line
Shifting the selected Rebar or Beat Marker line
In addition to shifting a rebar or beat marker line to the nearest note on either side of the line, Composer allows you to make adjustments that do not fall directly on a note. These types of adjustments are useful for songs that are syncopated or have other rhythmic variations.
![]() Shift to Left - When a rebar line is selected, clicking this button will shift the rebar line slightly to the left. This is handy for fine adjustments of intricate passages. (keyboard shortcut "Ctrl + Left Arrow")
Shift to Left - When a rebar line is selected, clicking this button will shift the rebar line slightly to the left. This is handy for fine adjustments of intricate passages. (keyboard shortcut "Ctrl + Left Arrow")
![]() Shift to Right - When a rebar line is selected, clicking this button will shift the rebar line slightly to the right. This is handy for fine adjustments of intricate passages. (keyboard shortcut "Ctrl + Right Arrow")
Shift to Right - When a rebar line is selected, clicking this button will shift the rebar line slightly to the right. This is handy for fine adjustments of intricate passages. (keyboard shortcut "Ctrl + Right Arrow")
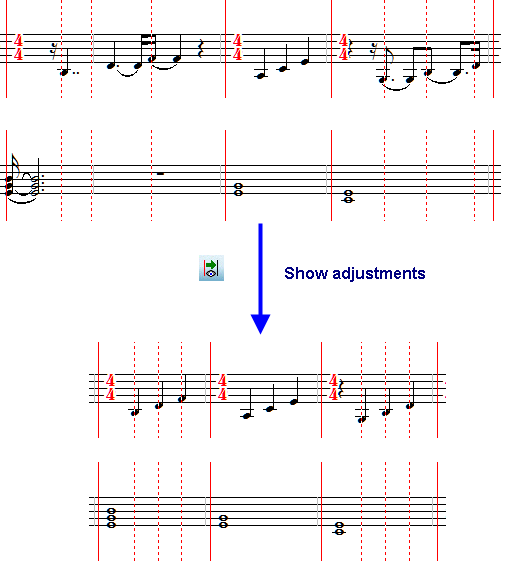
Reviewing the notation after editing rebar and beat mark lines
If you choose to use the "Record rebar lines or beats" method of entering editable rebar lines or beats, then Composer will automatically retranscribe the notation after your recording to show you how the new rebars or beats will adjust the notation. If you manually enter rebar lines or beat markers with your mouse, you can use the "Show adjustments" ![]() button at any time to see how your edits affect the transcription of the notation. Using this command often will give you a good idea of how changes you make will affect the notation, and help you learn what steps will quickly give you the notation you want for your songs.
button at any time to see how your edits affect the transcription of the notation. Using this command often will give you a good idea of how changes you make will affect the notation, and help you learn what steps will quickly give you the notation you want for your songs.
![]() Finalizing barline and beat adjustments
Finalizing barline and beat adjustments
When you are satisfied with the positions of the rebar lines and any beat adjustments that you have made within measures, and have checked them using the "Show adjustments" command, then you are ready to Finalize your changes to the score. Using the "Finalize" command or button will (1) commit all notation changes to the score (2) preserve the original playback of the score by keeping the tempo changes of the performance and (3) remove the rebar and beat marker lines from the score.

After finalizing your barline and beat adjustments, you can now go on to do any further note editing or score annotations that you need to complete your score for great sheet music of your song. Just click another tab such as "Text" to leave the ReBar feature, and enjoy working on your score!