|
<< Click to Display Table of Contents >> Tutorial: Adding Annotations |
  
|
|
<< Click to Display Table of Contents >> Tutorial: Adding Annotations |
  
|
In this step of the tutorial, we will "dress up" a score with several types of annotations, which offer the musician reading the score instructions and suggestions for performing the music:
| accent marks |
| dynamic marks |
| hairpin crescendo marks |
| tempo marks |
| slurs (phrase marks) |
Please note that if you plan to export your work as a MusicXML file to share with others that the MusicXML protocol associates annotations and dynamic markings with specific notes. Composer has the capability to associate some markings either with a note OR with a staff. If you plan to share your song file using a MusicXML filetype, then make sure that when adding dynamic markings that they are associated with a particular note, and not just the staff, so that they will show up properly in the receiving program.
We will start with an excerpt from the main theme of George Gershwin's Rhapsody in Blue. The starting file RhapsodyInBlueWithoutAnnotations.not will include only the notes, and no annotatons. We will add one of each type of annotation listed above. To see what the completely annotated score looks like, you can open and view the file RhapsodyInBlue.not.
![]() To open the starting file for this step of the tutorial:
To open the starting file for this step of the tutorial:
| Choose the Open command in the File menu, and open the file RhapsodyInBlueWithoutAnnotations.not in the directory C:\Users\Public\Documents\Notation_5\Songs |
![]() To add an accent mark:
To add an accent mark:
| 1. | With the mouse, navigate to the Accent Palette. |
| -- OR -- |
Type SHIFT+A.

Technically, some of the symbols in the Accent Palette are not accents. Rather, these marks are annotations that are displayed immediately above or below notes.
| 2. | In the Accent Palette, choose the type of accent you wish to add. |
You can add two accents for the same note or chord by selecting two symbols in the Accent Palette.
| 3. | Choose the Accent Palette option that determines whether the accent is displayed at the notehead |
| 4. | Click the mouse somewhere near (on top of, above, or below) the note or chord where you want to add the accent. |
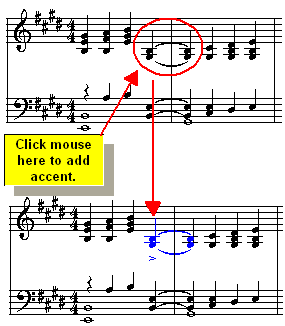
| 5. | To add more accents of the same type, click the mouse at other notes and chords. To add more accents of a different type, select a different accent from the palette, and then continue clicking the mouse where you want to add those accents. |
![]() To add a dynamic mark:
To add a dynamic mark:
| 1. | With the mouse, navigate to the Dynamic Mark Palette. |
-- OR --
Type SHIFT+D.

| 2. | In the Dynamic Mark Palette, choose the first letter of the type of dynamic mark you wish to add. |
-- OR --
Type the shortcut for the dynamic mark. For example, the shortcut for ![]() is "mf". The shortcut for
is "mf". The shortcut for ![]() is "f1", and for
is "f1", and for ![]() is "f2".
is "f2".
| 3. | Specify whether the dynamic mark should be placed |
| 4. | Click the mouse where you want to add the dynamic mark. |
![]() To add a hairpin crescendo mark:
To add a hairpin crescendo mark:
| 1. | With the mouse, navigate to the Crescendo Mark Palette: |
-- OR --
Type"<" for a crescendo, or ">" for a decrescendo mark.
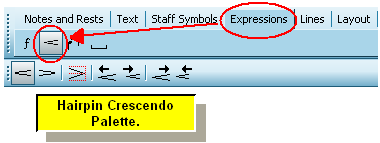
| 2. | In the Crescendo Mark Palette, click the Crescendo Mark |
This step is not necessary if you typed "<" or ">" in the previous step.
| 3. | Click the mouse where you want the beginning of the crescendo mark to start. Do not release the mouse button yet. |
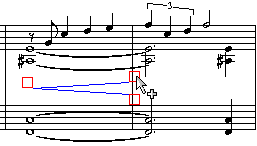
Composer will add a new crescendo mark, which will initially extend to almost the barline of the same measure.
| 3. | While still holding down the mouse button, drag the end of the crescendo mark to the left or right. Then release the mouse button. |
| 4. | Adjust the position of the crescendo mark by dragging the red |
Other options are available in the Crescendo Mark Palette for vertically centering the crescendo, or extending the start or end of the mark to an adjacent measure which is perhaps on a different line (system) or page of the score.
![]() To add a tempo mark:
To add a tempo mark:
| 1. | With the mouse, navigate to the Free Text Palette. |
-- OR --
Type SHIFT+F.
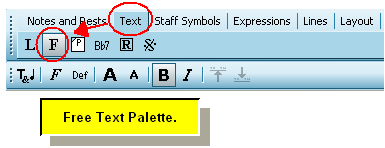
| 2. | Click the mouse where you want to add the tempo mark. |
Composer will display a blinking text cursor.
| 3. | Type the tempo mark text, and optionally use any text editing keys, such as |
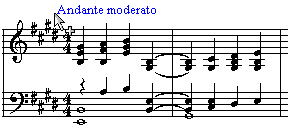
| 4. | Optionally, click buttons on the Free Text Palette to increase |
-- OR --
Type CTRL+![]() or CTRL+
or CTRL+![]() to increase or decrease the font size, and CTRL +B or CTRL+I for bold or italic.
to increase or decrease the font size, and CTRL +B or CTRL+I for bold or italic.
| 5. | Hit the ESC key when you are done typing and editing the tempo mark text. |
| 6. | To move the free text object, unselect it first by typing ESC or clicking elsewhere in the score. Then click the mouse on the text, and without releasing the mouse button, drag the text to a new position. |
It is also possible to mix music symbols with normal text in free text objects. For example, you can create a tempo mark that looks like this:
![]()
For instructions, see Mixing Music Symbols and Normal Text.
![]() To add a slur (phrase mark):
To add a slur (phrase mark):
| 1. | With the mouse, navigate to the Slur Palette: |
-- OR --
Type SHIFT+S. If the Sustain Pedal Palette is displayed first, type SHIFT+S a second time for the Slur Palette.
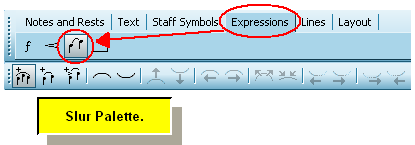
| 2. | To add a slur across several notes: |
| Click the mouse where you want the slur to start, but do not release the mouse button yet. |
| Drag the end of the slur to the last note that should be under the slur. |
| Start and end the slur above the notes to draw the slur above the notes. Start and end the slur below the notes to draw the slur below the notes. |
| Release the mouse button to complete the addition of the slur. |
Composer will automatically fit the slur to the contour of the notes above or below, and will adjust the start and end of the slur to appropriate positions relative to the first and last notes under the slur.
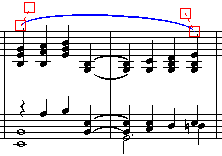
In many cases, you will likely find Composer's automatic placement of the slur quite acceptable. However, if desired, you can adjust the start and end position of the slur, and the shape of the slur.
| 3. | Adjust the position and shape of the slur by dragging the red |
Try dragging the four red ![]() handles to get a feel for how they work. For details, see Changing the Shape and Extent of a Slur.
handles to get a feel for how they work. For details, see Changing the Shape and Extent of a Slur.