|
<< Click to Display Table of Contents >> Advanced Reverb and Chorus for Realtime Audio |
  
|
|
<< Click to Display Table of Contents >> Advanced Reverb and Chorus for Realtime Audio |
  
|
Please note that the Notation Software Synth has an internal Reverb and Chorus that you can use without having to add VST3 plugins, and is easily editable using the GraphOverNotes feature. This feature of the NS Synth will likely satisfy most everyday musicians.
If you have a favorite VST3 plugin for various effects, though, this example explains in detail how to add a reverb to the trumpet instrument of the song ‘Oh when the Saints go marching in’ using a reverb VST3 plugin. Other plugins connect in similar fashion.

Example: Add a reverb to the trumpet instrument of the song ‘Oh when the Saints go marching in’
First of all, the song needs some preparation for the channel association. Please open the song in Composer and open the Staff/Setup dialog. We have selected the following channel association for the staves
Please notice the Trumpet is allocated to channel 1

Select the JACK driver

Make sure the Sound Designer Mode is selected

Then select "Sound Designer Mode"

In Sound Designer Mode Carla opens and displays the default sound design as this was the selected option. Select the Patchbay tab. Tip: with Ctrl +/- you can zoom in/out the graph.

Our song ‘Oh when the Saints go marching in’ does not use Notation’s internal reverb. Please see GraphOverNotes / "R"everb button and notice that the graph is at "0" for the internal Reverb.

In order to add a reverb to the Trumpet instrument (remember, it uses the MIDI channel 1) we would like to add a reverb VST3 to the clean channel 1.
Please double click

and a sub Carla for all the clean channels opens.

As part of the default sound design an Audio Gain plugin is used already.
There are great free reverbs VST3 plugins available. Here in this example we use the Dragonfly reverb VST3 plugin which is publically and freely available on Github under the GPL 3 license.
See https://github.com/michaelwillis/dragonfly-reverb
As of this writing the latest version of Dragonfly is 3.2.10. You can download the latest and greatest package from
https://github.com/michaelwillis/dragonfly-reverb/releases
Please use the 64 bit version ‘dragonfly-reverb-3.2.10-win64.zip’
After the download is completed please copy the DragonflyHallReverb.vst3 folder

to the Windows VST3 default folder (C:\Program Files\Common Files\VST3)

The next task is in Carla to add this plugin to channel 1.
However, because the VST3 is new to Carla, Carla needs to refresh its list of VST3s. Please see

Carla will scan the complete PC for VST3 files. When this is done the list above is updated and now shows the newly installed Dragonfly Hall and Reverb VST3. Please select it as shown in the next picture:

The added Dragonfly Hall Reverb plugin now shows up in the Carla sub graph might be outside of the viewable area

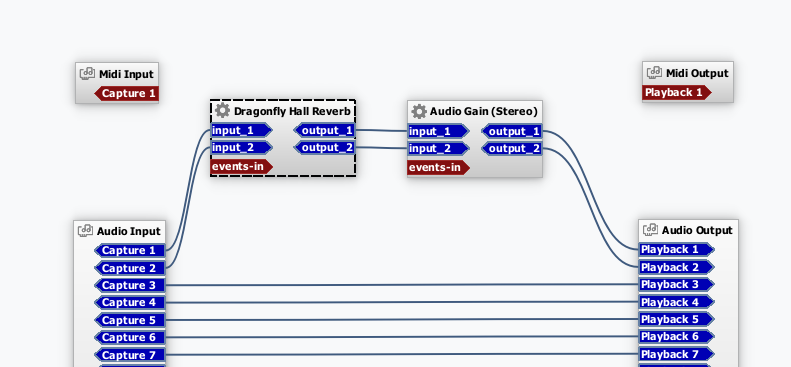
The next step is to insert the ‘Dragonfly Hall Reverb plugin’ between ‘Audio Input’ and ‘Audio Gain (Stereo)’. For this step the existing connections need to be disconnected.

After the connection are disconnected,

the ‘Dragonfly Hall Reverb plugin’ needs to be connected as such by drag and drop the connections with the mouse

Now double click to the ‘Dragonfly Hall Reverb plugin’ box

and the ‘Dragonfly Hall Reverb plugin’ opens

We now modify the default hall reverb setting for channel 1 while playing the Trumpet instrument by Composer. In our example we found the setting below to best demonstrate the new hall and reverb.
The red squares are the modifications which we make.

As a next IMPORTANT step the settings need to be saved and associated to the .not file of the song for a next usage. Saving is possible in the master Carla (not in the sub Carla which is for the clean channels only). When saving all settings of the sound configuration are saved like the layout of the graph, Audio Gain and in particular the hall and reverb settings of Dragonfly

The sound design file (carxp)-file is saved to the Notation family directory’s Sound_Design folder
(C:\Users\Public\Documents\Notation_5\Sound_Design)

At this stage the sound design is saved, however, a further step is required that the song’s .not-file ‘Oh_When_The_Saints_Go_Marching_In_Demo.not’ contains the information of the associated sound design (carxp)-file.
Please see the section of this documentation Sound Design Management for details on saving and accessing Sound Design files.