|
<< Click to Display Table of Contents >> Shifting Barlines |
  
|
|
<< Click to Display Table of Contents >> Shifting Barlines |
  
|
It is common that a MIDI file prepared by another MIDI program will have barlines that are misaligned with the downbeat of measures. This problem particularly happens if the song has an upbeat measure, which has a duration less than the meter of the song. This problem arises not because Musician cannot correctly interpret the barlines in the MIDI file, but because the barlines are misplaced in the MIDI file itself. Musician can, however, help you fix this issue quickly and painlessly.
Here is an example of misaligned barlines:

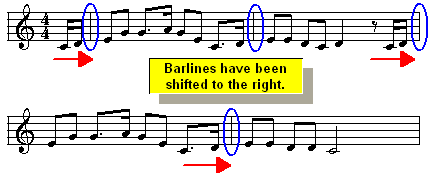
You can readily fix this problem by using the Shift Barlines command. The result will be this:

![]() To shift multiple barlines to the right:
To shift multiple barlines to the right:
| 1. | While holding down the CTRL key, drag the mouse over the range of measures for which you wish to shift the barlines. It does not matter which staff you select. |
-- OR --
Use the Select Region command in the Region menu to select a range of measures.
-- OR --
Select the entire range of measures by clicking the Select Staff ![]() button among the staff control buttons. (Please note that the actual selection color will be light blue.)
button among the staff control buttons. (Please note that the actual selection color will be light blue.)

| 2. | Navigate to the Barline Palette with the mouse. |
-- OR --
Type '|' (which is probably Shift + '\' on your keyboard).
| 3. | In the Barline Palette, click the Move Barlines |
-- OR --
Choose the Shift Barlines command in the Barline menu.
The mouse cursor will change to show a red double-barline, which you can move around on the score:
![]()
| 4. | Move the red double-barline to where you what the first barline to be shifted: |

| 5. | Click the mouse button. |
A barline will be inserted where you clicked the mouse, and all of the remaining barlines in the selected region will be shifted by the same number of beats as those in the first partial measure that you have created:

This will create a partial measure at the beginning of the selected region. If this is at the beginning of the song, you probably want this to be an upbeat measure, and do not want to see the partial meter, which is the 1:8 meter in this example. Also, this will create a corresponding partial measure at the end of the selected region, which is the 7:8 meter in this example.
| 6. | To correctly display the meter in the upbeat measure, double-click it. That will bring up the Change Meter dialog box. Set a check mark for "This is an upbeat measure." |
| 7. | Optionally delete the trailing partial measure, which is the 7:8 meter in this example. |
-- OR --
Change the meter value for that partial measure.
The final result of the above procedure is as displayed at the top of this topic.