|
<< Click to Display Table of Contents >> Creating Upbeat Measures |
  
|
|
<< Click to Display Table of Contents >> Creating Upbeat Measures |
  
|
An upbeat measure begins a section of a song with fewer beats than the full count of beats in the meter.
This topic describes how to create an upbeat measure if the barlines in your song are already correctly aligned with the downbeat of measures. If you have imported a MIDI file, or recorded MIDI, such that the barlines are misaligned with the downbeat of measures, then you can shift the barlines, as described in the separate topic, Shifting Barlines.
If a section of a song begins with an upbeat measure, and that section has repeats, then the section normally ends with a partial measure. The total number of beats in the upbeat measure and the last measure of the section equals the total number of beats in the meter of the section.
The procedure in this topic shows how you can create an upbeat measure, and corresponding last measure of the section, with repeat marks. In the example, we will start with the following score:

We will change the first measure to an upbeat measure; split the third measure to create the section's last measure, which complements the first measure; and add repeat marks.

If you need only to create an upbeat measure, you need only follow the first few steps in the following procedure.
![]() To create an upbeat measure and a corresponding trailer measure with repeat marks:
To create an upbeat measure and a corresponding trailer measure with repeat marks:
| 1. | Split the first measure where you want the upbeat to start. Usually you will want to split the measure where the first note follows preceding rests. See Splitting Measures for instructions. |

| 2. | Delete the left half of the split measure. See Deleting Measures for instructions. |

| 3. | Hide the meter of the upbeat measure, as follows: |
| (a) | Type SHIFT+M to display the Meter Palette. |
| (b) | Click the meter |
| The mouse cursor will turn into this shape: |
| (c) | Click the upbeat measure. |
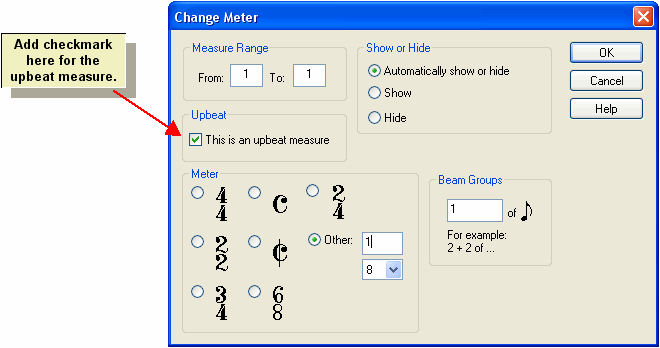
Musician will display the Change Meter dialog, as shown here:

| (d) | Add a check mark for "This is an upbeat Measure". Then click the OK button. |

| 4. | Skip the remaining steps of this procedure if your goal is only to create the upbeat measure. |
| 5. | Split the last complete measure of the section so that the right half has the same number of beats as the upbeat measure. See Splitting Measures for instructions. |

| 6. | Select the barline after the upbeat measure, and change its type to a start-repeat. Select the barline at the end of the repeated section, and change its type to an end-repeat. See Barlines for instructions in changing the barline type. |

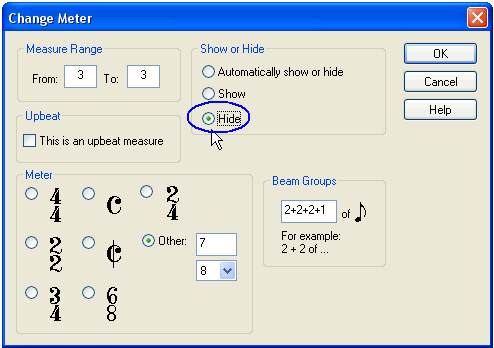
| 7. | Hide the meter in the newly split measure at the end of the repeated section. Follow the instructions in step #3 to display the Change Meter dialog for the section's last measure, which is the 7:8 measure in this example. Set a check mark by the hide button: |

The result of this step is:

| 8. | Hide the meter in the newly split measure that follows the end of the repeated section, following the same instructions as Step 7 above. |
NOTE: Do not attempt to hide the meters in both measures with one visit to the Change Meter dialog, because that will incorrectly make the meter for both measures the same.
The result of this step completes the overall task:
